Gutenberg is the code name for WordPress’s new block-based editor, released in version 5. With its release Gutenberg has revolutionized the ever-changing world of WordPress and changed the way how you produce and manage content. It replaces the classic WordPress editor, which is based on TinyMCE. If you’re new to WordPress, you’re undoubtedly thinking, “What is Gutenberg?” This feature is listed on various plugin and theme pages, but as a beginner, you may not understand what it is or why it is so special. Let’s delve deeper to learn more about it!
Overview of Gutenberg
The block editor is named after Johannes Gutenberg, who invented the printing press and revolutionized the publishing business. Gutenberg, which is also known as the WordPress block editor, uses blocks to create content, which is a very different approach from TinyMCE. This easy-to-use system makes it easier to build pages and add information, so even the average user can create websites and amazing content. It gives you more control over the content you create than ever before, letting you make and change more than ever before.
What is Gutenberg? (WordPress’s Block Editor)
Gutenberg is the default WordPress editor, replacing the previous traditional editor. It allows you to create and design content using separate blocks for text, photos, videos, and other website elements. The drag-and-drop interface gives you more flexibility and creative options.
In the WordPress community, Gutenberg is more than just a content editor. It also relates to the Gutenberg project, which aims to improve the overall editing experience on WordPress. Gutenberg is multilingual with an easy to use interface and amazing customization.
Features of Gutenberg:
Now, let’s take a look at some of the significant features that the WordPress Gutenberg Editor offers.
Compatibility and Integration: Gutenberg editor is compatible with the majority of WordPress themes and plugins, ensuring a smooth integration without disrupting the site.
Easier editing: This was marked with the release of the Gutenberg block editor in WordPress 5.0, which provided a new and more simple way to build websites.
Block Editing: It offers you the option to modify the content by using blocks.
Customization: WordPress includes website design tools based on the Gutenberg interface, including block patterns, full-site editing, a block directory, and block themes.
Multilingual. The team is also striving to make the core software useful for websites in other languages.
Reusable Blocks: If you regularly add the same information to your posts or pages, the reusable blocks feature might help you save time.
Ease of Use: The drag-and-drop tool makes it easier to create pages and posts.
Embeds: It enables you to embed content from a variety of sources, including social media sites and video platforms, right into your WordPress sites.
Full Site Editing (FSE): Using the block concept, you can manage and customize your entire website.
How Does Gutenberg Work?
The Gutenberg WordPress block editor allows you to add and edit individual content blocks in posts and pages. Each block is an independent component with user-configurable properties. Creating content with the block editor is simple. To use the Gutenberg interface, navigate to Pages or Posts → Add New from the WordPress dashboard.
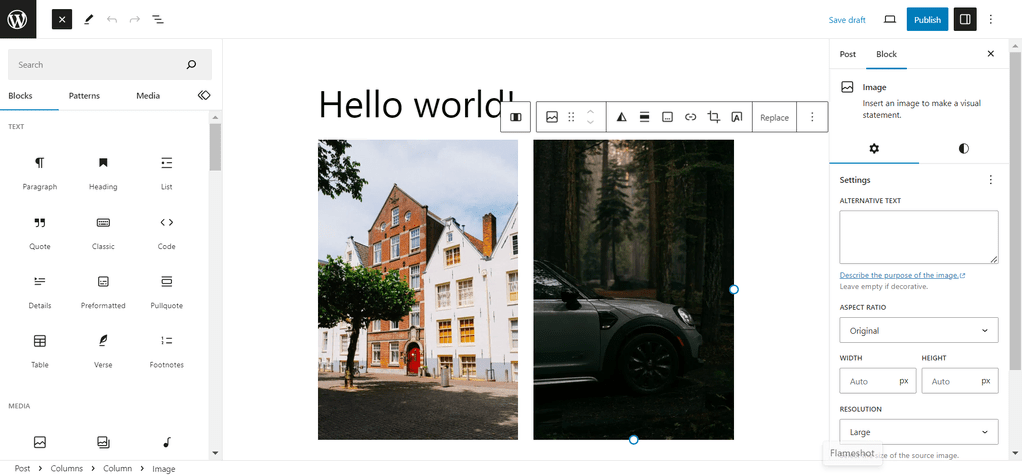
Clicking the block inserter + icon on the left will display all of the blocks organized by function. Simply drag and drop a block into the Gutenberg editor and arrange it where needed. The WordPress block system allows you to customize the entire block using the toolbar located on top of the element or in the options bar on the left-side panel.
If you want to design more efficiently, Gutenberg offers block patterns. These are block combinations that include columns, photos, and buttons. Tech-savvy WordPress users can also create and share their own WordPress blocks and block patterns.
How to Navigate in Gutenberg
With the background information out of the way, it’s time to walk you through the Gutenberg block editor. Let’s start with how to navigate it:
Block Navigation
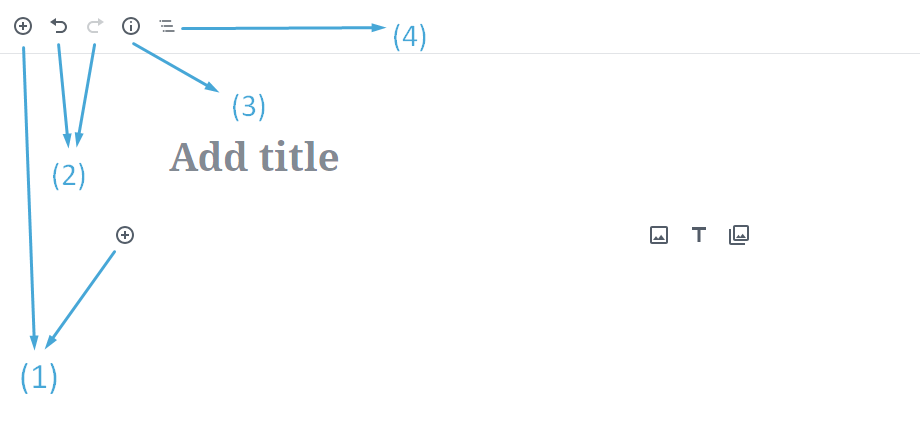
- Add a new block
- Undo and Redo buttons
- Content structure (word count, headings, paragraphs, blocks)
- Block navigation (a drop-down displaying all the block types used in the post)
Sidebar Navigation
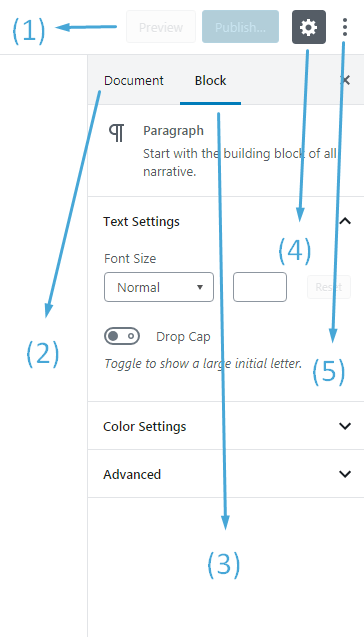
- Preview and Publish the post
- This is the classic WordPress sidebar: categories, tags, permalink, and publishing options
- Block settings: when you click on a block in the editor, you get its unique set of options in the sidebar
- Hide sidebar
- More editor settings
How to Efficiently use Gutenberg WordPress’s Block Editor?
Let’s go through some important WordPress Gutenberg features and how to use Gutenberg for your website.
How to Customize Blocks?
Customizing Gutenberg blocks in WordPress is simple. When you click on any block in your content editor, the toolbar for that block will show at the top. The block toolbar is dynamic, meaning it adapts to the block type you select. For example, if you select a table block, the toolbar provides choices for changing text alignment and creating new rows and columns.
Aside from the block toolbar, the block settings include customization options. To access the right-side panel, click the settings button in the top-right corner of the Gutenberg editor.
Here, select the Block tab. Depending on the block you’ve chosen, you can change styles, size, and typography. If you are an advanced user you can add additional HTML or CSS to further customize the element.
How to Add a New Block?
The initial step in utilizing the block editor is to create a new block, which is done in a variety of ways. On the Gutenberg user interface, you will notice that a title block is already there on the page or post. Simply move your cursor below it and click the black plus icon to choose the first block to include. If the element you want isn’t listed, click the Browse all option.
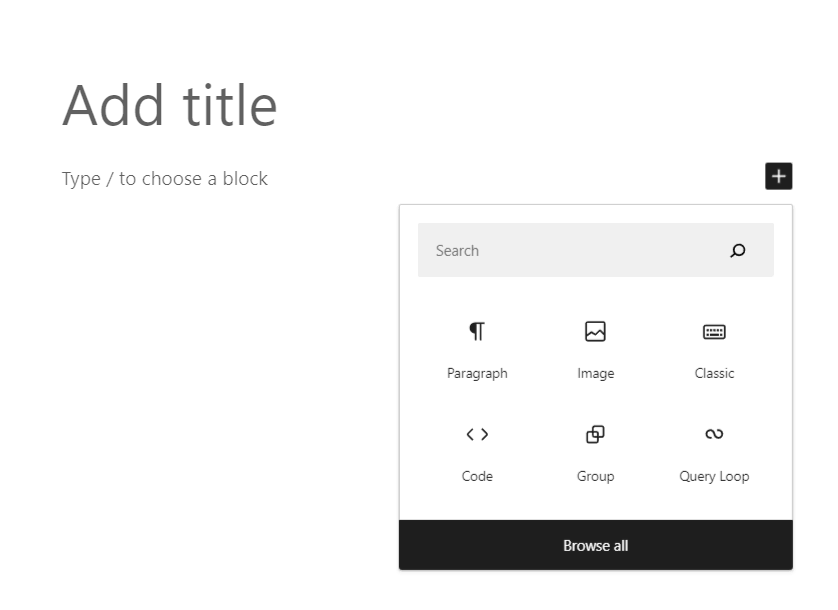
Adding a block with the black addition button on the Gutenberg editor. Another way to add additional blocks is to use the block inserter interface, which is accessible via the blue + button in the top left corner. There, all the blocks are properly arranged. Use the search bar to easily locate the exact block you require.
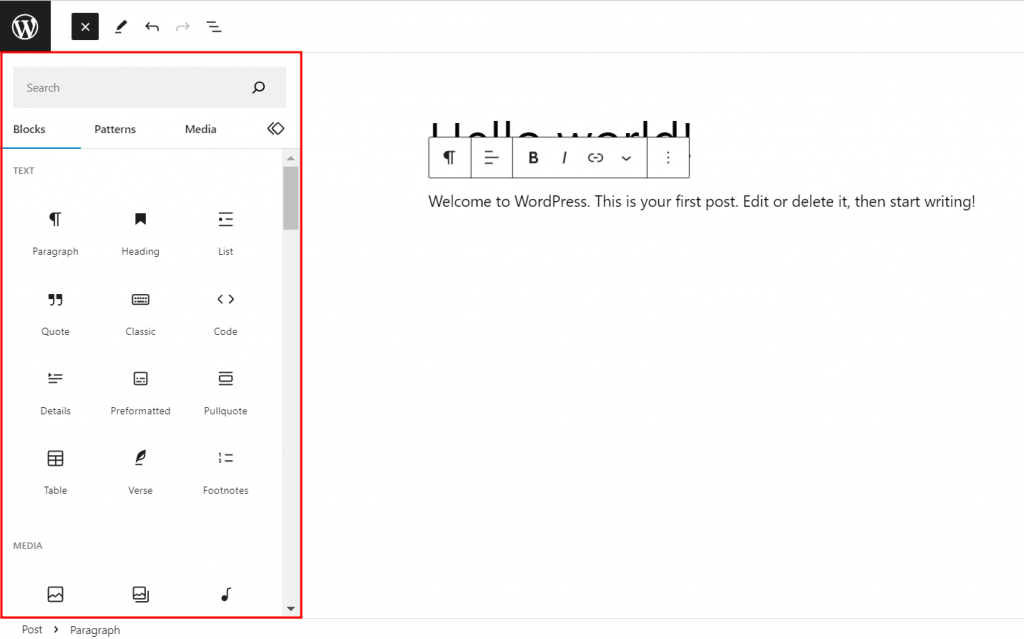
If the block you’re looking for isn’t available, the inserter will provide options from the Gutenberg block directory. It is part of the WordPress plugin repository for single-block plugins.
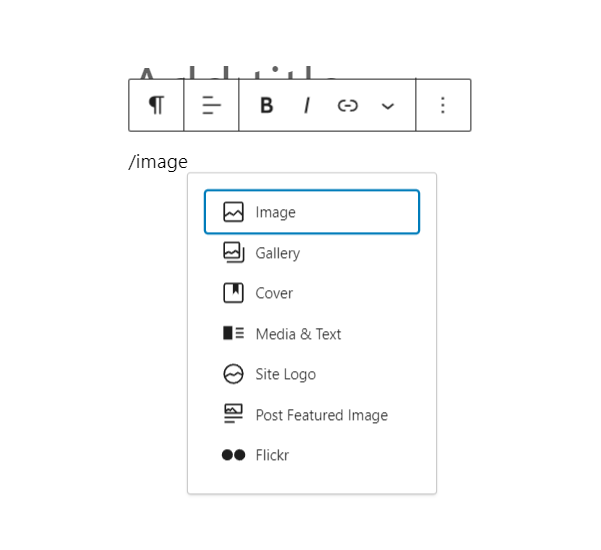
Finally, you can create new blocks by typing slash /. Then, write the type of block you’re looking for and press Enter on the keyboard.
How to Arrange Blocks?
One of the most common operations you’ll perform in the Gutenberg editor is moving content items around.
To rearrange blocks, click on each block and then select the six-dot icon from the toolbar. Then drag it to the appropriate spot.
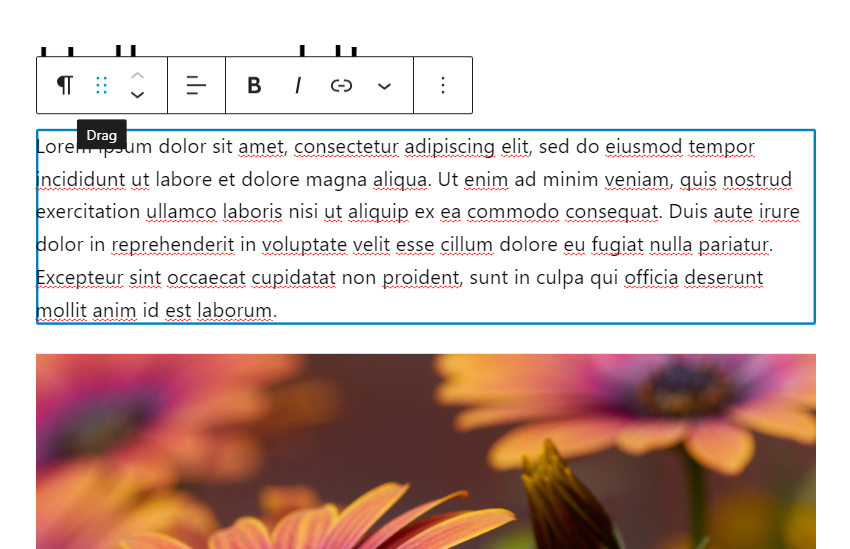
To drag a paragraph block in the WordPress block editor, select the six-dot icon.
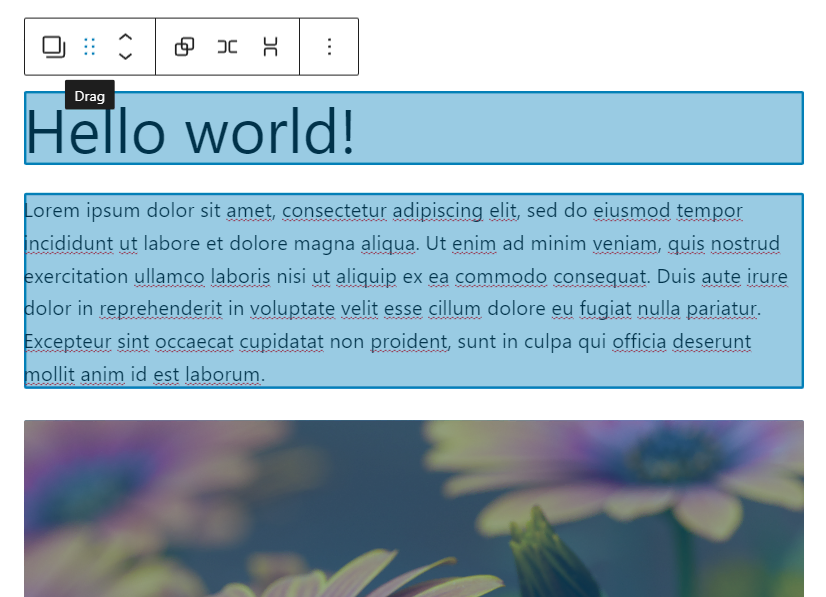
In addition, the editor allows you to select and move many blocks at the same time.
To group blocks, click on the first block, then hold down the Shift key on your keyboard and choose the parts above or below it as needed. Then, with the six-dot symbol, drag the selected blocks together.
On the WordPress block editor, select multiple blocks and drag them together using the six-dot icon.
How to Group Multiple Blocks?
Assume you’re developing a Services section on your homepage and want to present each item with an image, a headline, and a description, all perfectly aligned. Grouping blocks can be handy in this circumstance since they allow you to control the entire section as a single entity.
You can use the Group, Columns, Row, and Stack blocks to group together several blocks. These settings are accessible in the Block Inserter’s Design section.
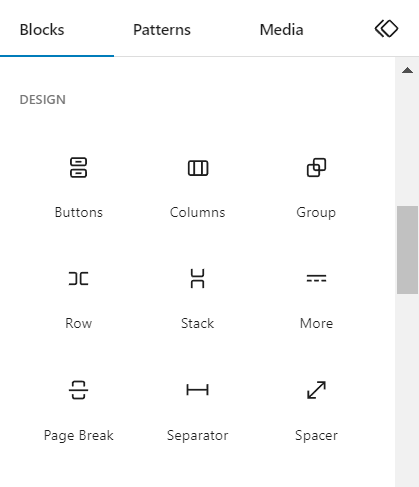
When you use these design blocks to group many items, you get indented nested blocks. They refer to blocks that are placed inside a parent block to create an organized layout.
For example, a column block can serve as a parent for other blocks such as texts and graphics. The editor interface shows these child blocks indented under the parent block.
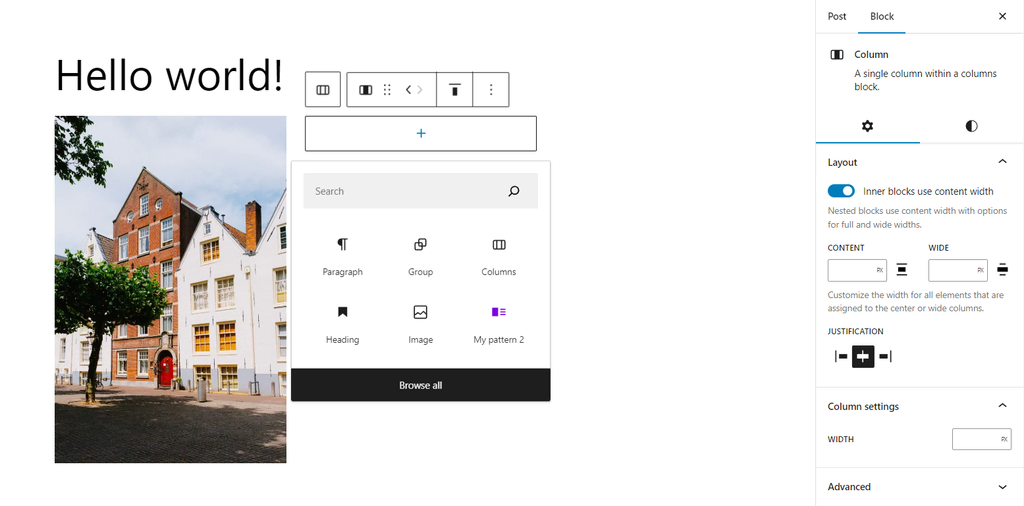
Let us demonstrate this method using the columns block as an example:
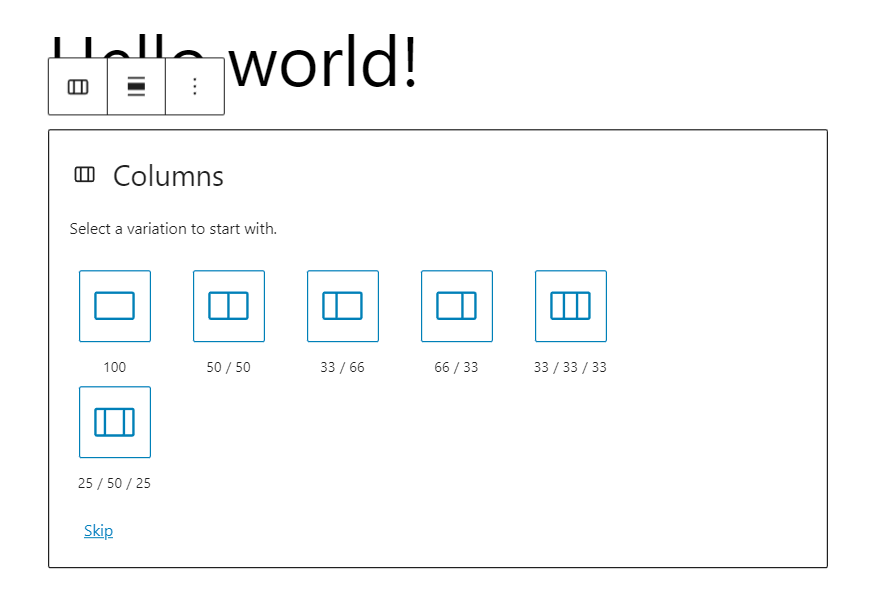
- Select Block Inserter → Design → Columns.
- Once added, choose a pre-designed column variation. Alternatively, you can skip it and make a bespoke version.
- Then, click the plus (+) sign to add blocks to each column.
Finally, use the alignment options in the toolbar or the sidebar block settings to change the layout of these grouped blocks.
The Inner blocks utilize the content width option available in the sidebar block settings, allowing the nested inner blocks to conform to the content width of their parent block.
How to Add Headings and Text
You can add text to posts or pages using paragraph and heading blocks.
The simplest way to create a new paragraph block is to type right into the Gutenberg interface. Alternatively, open the block inserter and choose Paragraph.
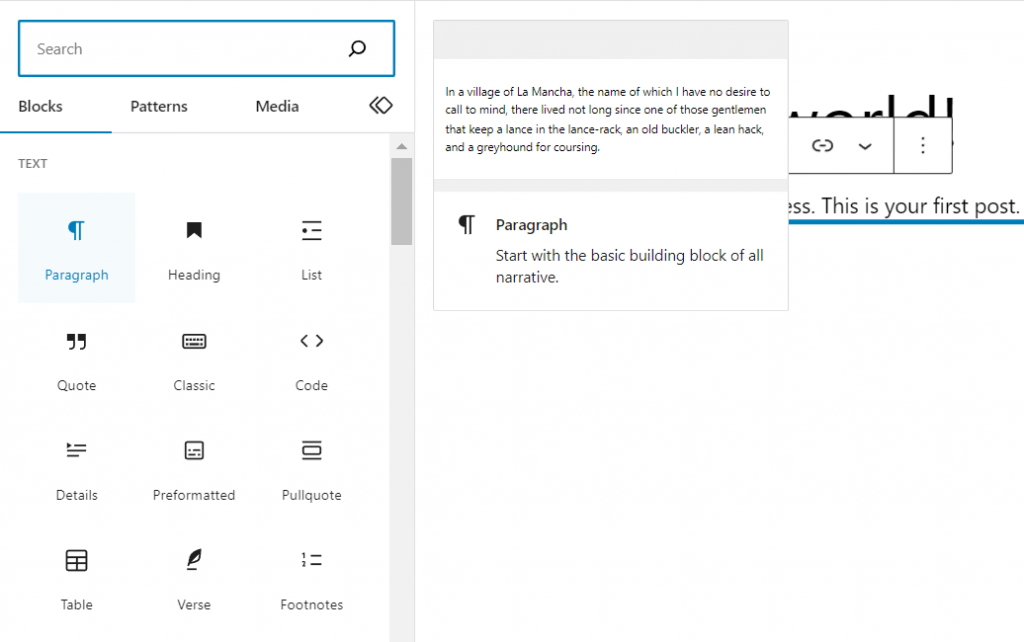
This block has a toolbar with basic settings for text alignment, bold or italic styling, and link embedding. You can also add footnotes, highlights, inline pictures, and typographic features such as subscripts and superscripts.
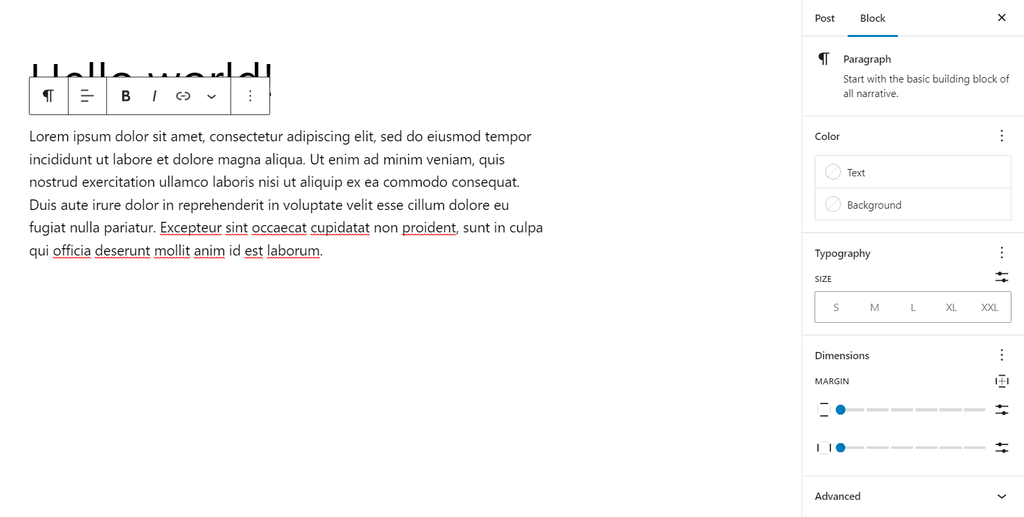
On the other hand, the right-side paragraph block options allow you to adjust the text’s color, typography, and dimensions to improve the appearance of the content.
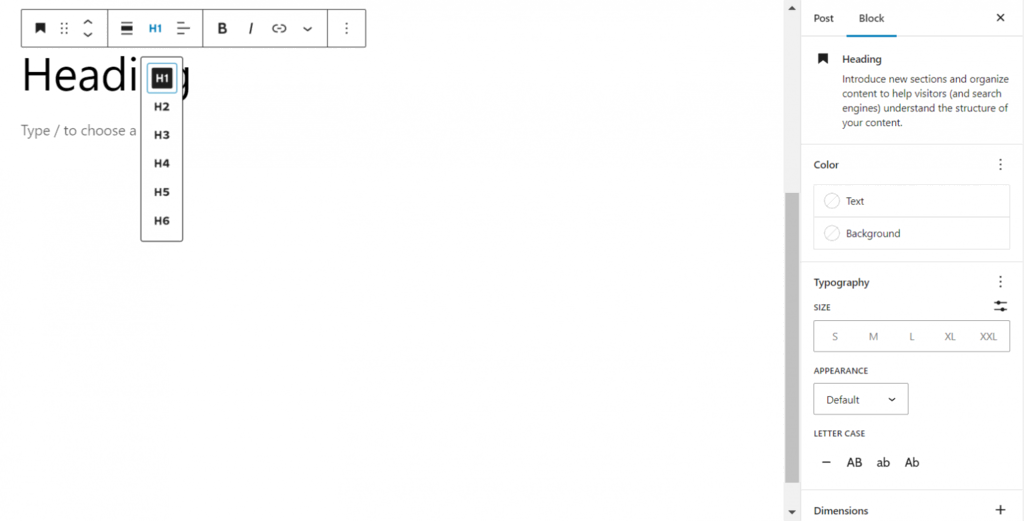
A heading block can assist structure the text, allowing readers and search engines to understand how one section ties to the next.
To add a heading, use any of the previously listed techniques for adding WordPress blocks, then click Heading. From here, select the proper heading level from the block’s toolbar, ranging from H1 to H6.
The heading block, like the paragraph block, allows you to change the width, alignment, and other aspects of the text using the toolbar or side panel settings.
How to Add Images and Media
The Gutenberg WordPress editor allows you to include a variety of media kinds in posts and pages, including the conventional Image, Audio, Video, and File blocks. It also provides various dynamic content blocks, like:
Media and text: This block allows media and written content to be displayed side by side, boosting the storytelling experience.
Image gallery: This option is perfect for showing many image files in one place, making it great for photography and portfolio websites.
Cover: A distinct block for overlaying text on photos or movies, ideal for producing visually striking headers or highlights.
The steps for adding these blocks are relatively similar. Select your preferred element from the Gutenberg block library. Next, upload the media file or choose an existing one from the media library. You can also use a URL to upload an audio or image file.
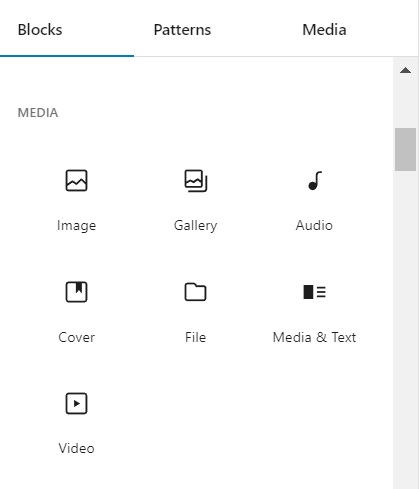
To save time, numerous image files can be dropped into image and gallery blocks at the same time.
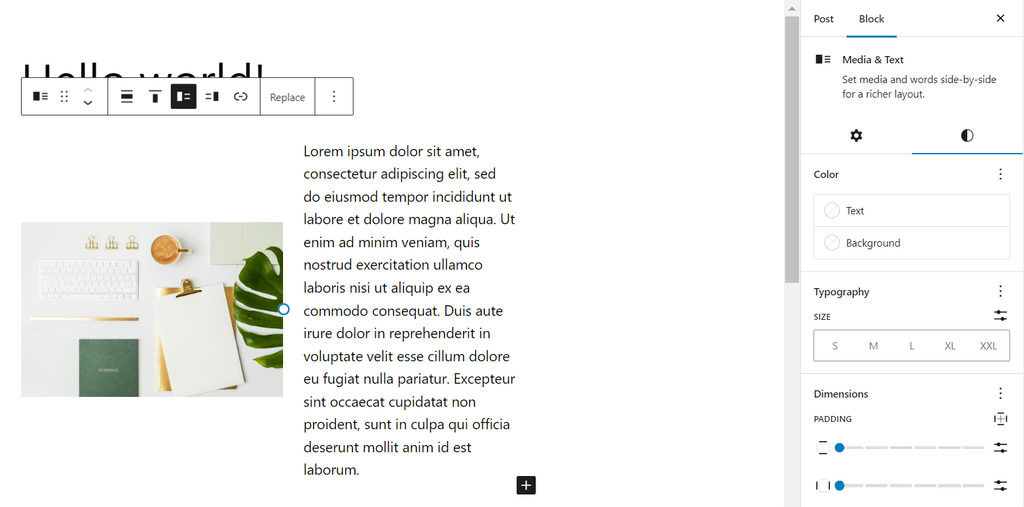
Each block includes its own toolbar and options. For example, the Image block supports alterations such as rounded edges, border modifications, and radius settings. Meanwhile, the Media & Text block offers choices for adjusting alignment, mobile stacking, color schemes, and typography.
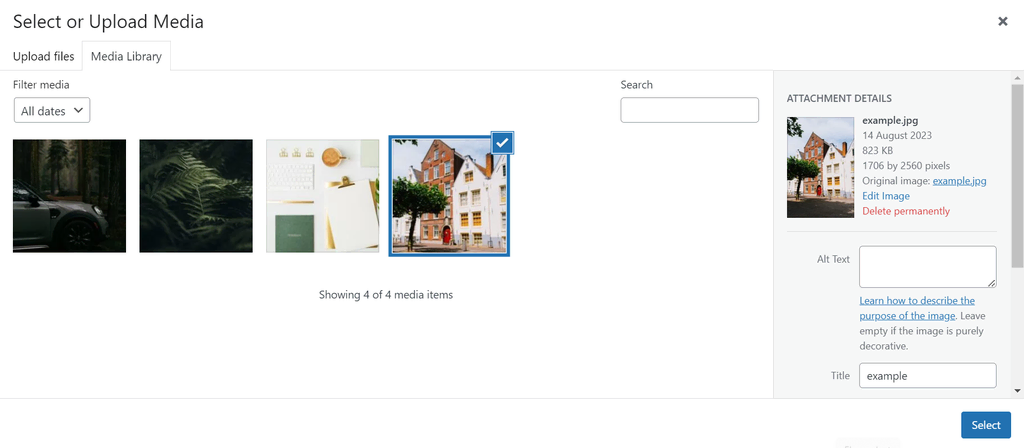
To get more visuals, navigate to the block inserter → Media → Openverse, WordPress’ collection of openly licensed images.
How to Embed Media With Gutenberg Block Editor
By default, the WordPress block editor accepts a variety of media formats from multiple services.
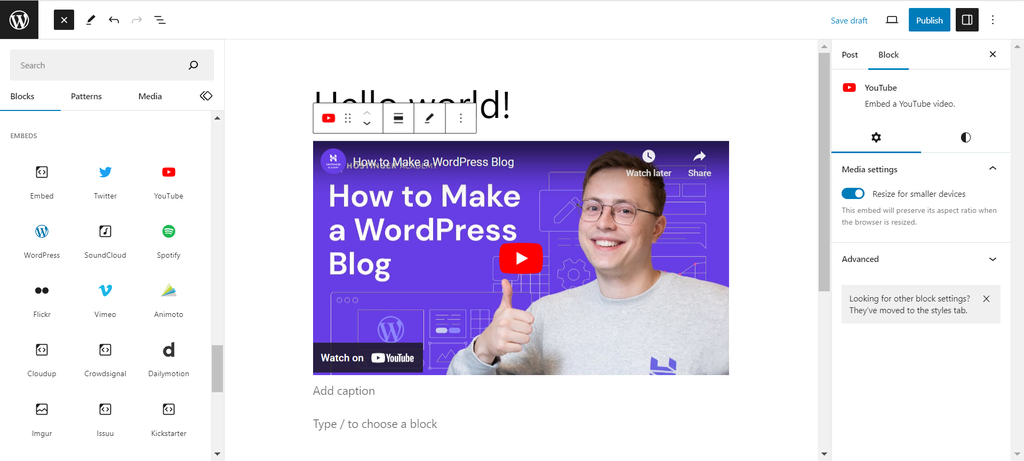
Below are some instances of dedicated blocks for embedding content:
- Videos on YouTube, Vimeo, Dailymotion, TED, and TikTok.
- Images sourced from Flickr, Imgur, Instagram, and Pinterest.
- Posts on Facebook, Twitter, and Reddit.
- Audio files from Spotify, SoundCloud, and Mixcloud.
- Follow the steps below to embed media:
- Open the block inserter and scroll down to the Embeds section.
- Choose your preferred media source.
- Paste the media URL and click Embed.
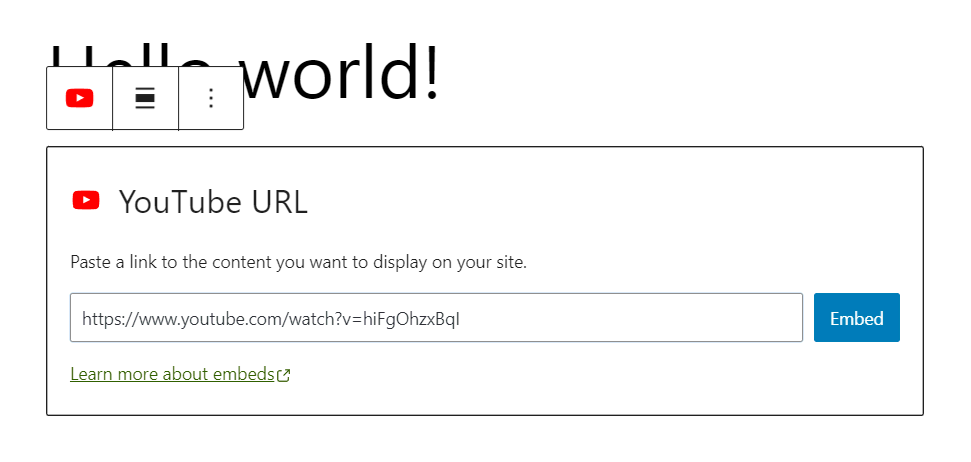
The embedded information will now be displayed on the page or in the post.
- Documents from Scribd and Issuu.
- Polls and surveys from Crowdisgnal.
Follow the steps below to embed media:
- Open the block inserter and scroll down to the Embeds section.
- Choose your preferred media source.
- Paste the media URL and click Embed.
- The embedded content will now be displayed on the page or in the post.
How to create Synced Patterns with Gutenberg Block Editor
Previously known as reusable blocks, synced patterns are collections of content snippets that you may utilize throughout your website. They serve to streamline operations and keep a uniform appearance across multiple pages and posts.
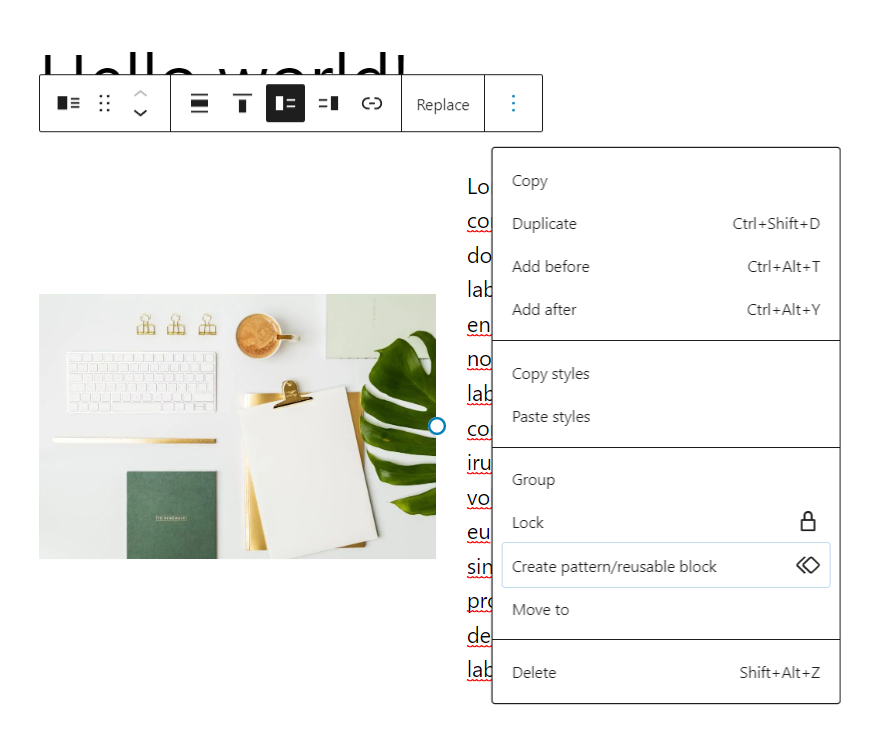
When you update a synced pattern, the changes are automatically applied to all block instances on your site.
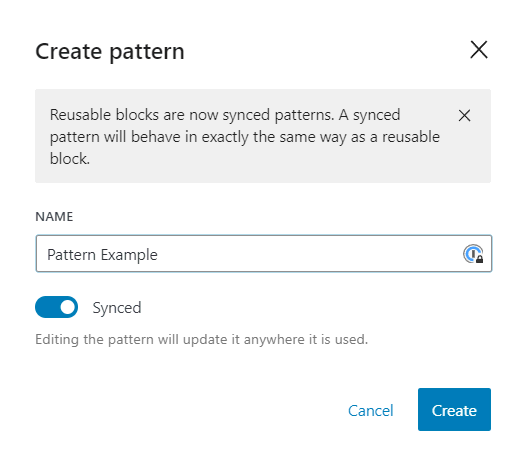
Follow these procedures to produce synced patterns:
- Select the part you want to preserve as a synced pattern.
- Choose the Options button from the toolbar and then click Create pattern.
- Name the pattern and enable the Synced menu so that the block updates synchronously across the site whenever a change is made. Then click Create.
- To apply the pattern, go to the block inserter and select the synced pattern icon on the far right. Alternatively, enter slash / followed by the block name directly into the editor.
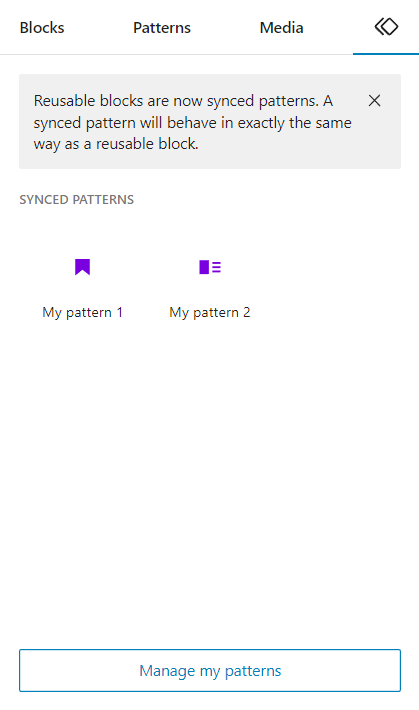
You can also click Manage my patterns on the block inserter to access the block manager, where you can customize and perform bulk actions on many synced patterns.
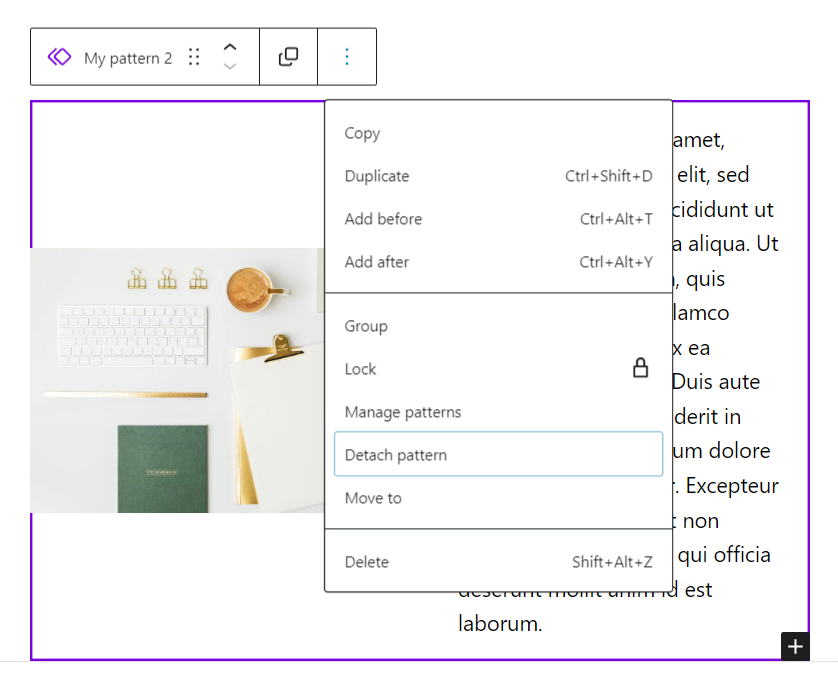
To apply a block pattern to a page or post without affecting other instances, open the three-dot option on the block’s toolbar and select Detach pattern. This action makes the block independent, so any changes made here will not affect other pages or posts.
How to Utilize Gutenberg Keyboard Shortcuts
If you’re a keyboard-dependable person using Gutenberg block editor, you’re in luck because there are many keyboard shortcuts to speed up your workflow:
Save changes: Ctrl + S
Undo a change: Ctrl + Z
Duplicate a selected block: Ctrl + Shift + D
Insert a new block before a selected block: Ctrl + Alt + T
Insert a new block after a selected block: Ctrl + Alt + Y
Move a selected block up: Ctrl + Shift + Alt + T
Move a selected block down: Ctrl + Shift + Alt + Y
Open document overview panel: Shift + Alt+ O
You can also type / and type the initial letters of a block to insert it instead of reaching for a mouse and clicking the “+” button.
Tips for Using Gutenberg Block Editor More Efficiently
- You can use / (Forward Slash) to quickly insert blocks
- You can easily insert images by dragging them from your desktop
- If you don’t like floating toolbar then pin the formatting toolbar to the top of the editor
- You can easily copy a block and all its settings
- By using block list view you can quickly select the right block
- With the code editor you can complete posts
- You can hide blocks and clean up your interface
- Add anchors for jump links
How to Disable Gutenberg Block Editor
The Gutenberg WordPress editor is one of the most controversial WordPress features ever. Fortunately, users who simply dislike the “block” paradigm can easily switch back to the conventional editor.
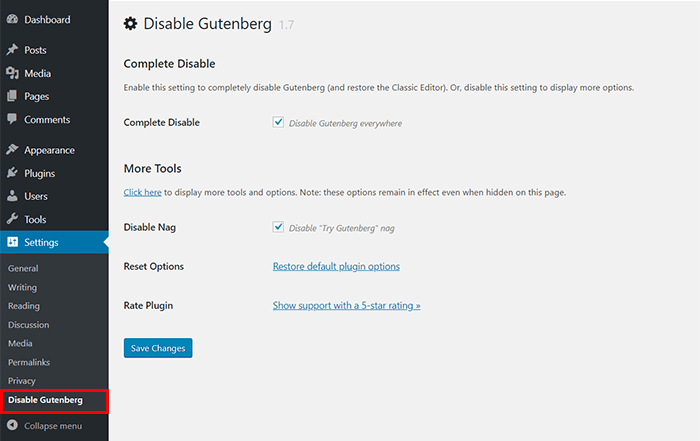
Disable Gutenberg is one of the most popular ‘Anti-Gutenberg’ plugins out there. It seeks to remove the block editor and replace it with the Classic WordPress Editor.
The plugin allows you to eliminate any Gutenberg track from WordPress, including the invitation to “Try Gutenberg” that appears on WordPress versions previous to 5.0. Once the plugin is installed, all options are available (and activated by default) in a new section of the “Settings” menu.
Alternative for Gutenberg Editor
The WordPress Gutenberg Editor has several alternatives. Among the most common ones are:
- Classic Editor plugin
- Elementor
- Visual Composer
- Beaver Builder
- Divi Builder
The Pros and Cons of Gutenberg Block Editor
If you’re a Classic Editor user, you may be considering switching to Gutenberg. Meanwhile, if you’re new to both editors, you might wonder if Gutenberg is the better option. Let’s take a look at Gutenberg’s pros and cons.
Pros
- Makes the content creation process more simple and easier for beginners
- Helps you see your content in a format that is closer to how it will appear on the front end.
- Eliminates the need for distinct shortcodes, therefore unifying the content production process.
- Expands your content customization choices with a range of discrete elements.
- Gutenberg eliminates the need to install a separate page builder plugin.
Cons
- Although Gutenberg tries to give an easy interface, its extensive choices and settings may make it more difficult to master than the Classic Editor.
- If you go from Classic to Block editor, your site may break. You may need to go over each post and page and redesign them using Gutenberg.
Gutenberg has become the default WordPress editor. In fact, the WordPress team ended support for the Classic Editor in 2022. So, if you’re still using the old editor, now is the time to switch to Gutenberg.
Conclusion
Mastering Gutenberg is more than just learning the fundamentals; it’s about releasing your creativity and leaving your mark on the digital landscape. As you embark on this journey, remember that each block is a blank canvas ready for your personal touch. Are you ready to unlock Gutenberg’s full potential? Dive into this complete guide to transform your WordPress experience.

